PAUL Morphy scored +3=1-0 against Louis Paulsen's ...e6 Sicilian in the final of the First American Chess Congress, held in New York in 1857.
This was very convincing, especially when considered against his much narrower plus-score as Black of +2=1-1.
Morphy's priority, as in his play against the French and the Petrov, was speedy development.
But he was not blind to positional considerations. Indeed he made a point of targeting the hole Black allows at d6 in the ...e6 Sicilian.
And he took time out in their second Sicilian to play the positional a4 to prevent Black getting in an effective ...b5.
What is perhaps particularly significant is that, contrary to his usual practice in 1.e4 games, Morphy did not castle early.
In games one and three he castled on the 11th move, in game two on the 15th, and not at all in game four.
Clearly he recognised, as is common knowledge today, that early castling in semi-open games is not as urgent or as beneficial as in open games.
It could be objected that he used to castle early against the French, which is a semi-open game, but Morphy did that because he turned the French into an open game by clearing the e file of pawns.
In modern chess, Black often plays ...a6 in ...e6 Sicilians, ensuring the hole at d6 will not be an issue, at least early on. This modern treatment is at least partly due to how Morphy exploited d6 in his games against Paulsen.
The modern treatment limits the lessons we can learn from Morphy's play in this match. But his fondness for speedy development, while keeping a watch for positional opportunities and not obsessing about early castling, are useful indicators.
Showing posts with label Louis Paulsen. Show all posts
Showing posts with label Louis Paulsen. Show all posts
Sunday, 22 September 2019
Saturday, 21 September 2019
Morphy v The ...e6 Sicilian (part four)
Paul Morphy - Louis Paulsen
First American Chess Congress
Final - Game 7
1.e4 c5 2.Nf3 e6 3.d4 cxd4 4.Nxd4 Bc5 5.Be3 Qb6 6.Nc3
Morphy preferred 6.Nb5!? in his previous game as White.
6...Qxb2?
This loses, rather than gains, material.
Overwhelmingly more popular today is 6...Nc6, which seems to have been the invariable choice of Michael Basman, who played this line a lot in the 1970s.
7.Ndb5 Bxe3
Even worse is 7...Na6? 8.Bxc5 Nxc5 9.Rb1.
8.Rb1
Black loses his queen.
8...Qxb1 9.Nxb1 Bf4 10.g3 a6
If Black's dark-square bishop is driven from the b8-h2 diagonal, Nc7+ is curtains.
11.gxf4 axb5 12.Nc3 Ne7
Or 12...b4 13.Nb5, eg 13...Na6 14.Nd6+ Ke7 15.Bxa6 bxa6 16.Qd4.
13.Nxb5 0-0 14.Nd6 Nbc6
14....Rxa2 restores an approximate material equality, at least in the view of those authorities who reckon rook, knight and pawn are worth a queen, but White is much better. One line given by Stockfish10 runs 15.f5 b6 16.Rg1 Ba6 17.f6 Ng6 18.fxg7 Kxg7 19.h4 Bxf1 20.Kxf1 h5 21.f4, and if 21...f5, to stop 22.f5, then 22.Rg5 is very strong.
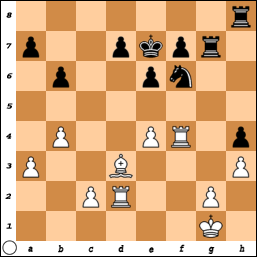
15.Rg1 Rxa2 16.f5 f6 17.Bc4 Ra4 18.f4 b6 19.fxe6 dxe6 20.Nxc8 Nxc8 21.Bxe6+ Kh8 22.Bxc8?
This gives away much of White's advantage. A strange lapse by Morphy, especially when White had several strong moves, including 22.Qg4 and 22.Bd5.
22...Rxc8!?
More obvious is 22...Rxe4+ 23.Kf2 Rxc8, when the main line given by Stockfish10 and Komodo10, 24.Qd5 Rd4 25.Qe6 Rd2+ 26.Kg3 Rdd9 27.Rd1 Re8 28.Qd7, does not look a clear win for White.
23.Qd7?
White is better, but not necessarily winning, after 23.Qd5 Ne7 24.Qd3.
23...Ne7??
Did Paulsen really play this howler? Yes, according to all the sources I have consulted, and yet it is hard to believe he (and Morphy, for that matter) missed 23...Rxe4+, when Black is fine.
24.Qxe7
24.Qxa4 is also rather good.
24...Ra1+ 25.Kf2 Rxc2+ 26.Ke3 1-0
A strange finish, although the later moves would make a lot more sense if White had played 18.f3 rather than 18.f4. That way, 23.Qd7 would not be a mistake, but the best move in the position. And Black's reply, 23...Ne7, would not be a howler as Black would be lost anyway.
First American Chess Congress
Final - Game 7
1.e4 c5 2.Nf3 e6 3.d4 cxd4 4.Nxd4 Bc5 5.Be3 Qb6 6.Nc3
Morphy preferred 6.Nb5!? in his previous game as White.
6...Qxb2?
This loses, rather than gains, material.
Overwhelmingly more popular today is 6...Nc6, which seems to have been the invariable choice of Michael Basman, who played this line a lot in the 1970s.
7.Ndb5 Bxe3
Even worse is 7...Na6? 8.Bxc5 Nxc5 9.Rb1.
8.Rb1
Black loses his queen.
8...Qxb1 9.Nxb1 Bf4 10.g3 a6
If Black's dark-square bishop is driven from the b8-h2 diagonal, Nc7+ is curtains.
11.gxf4 axb5 12.Nc3 Ne7
Or 12...b4 13.Nb5, eg 13...Na6 14.Nd6+ Ke7 15.Bxa6 bxa6 16.Qd4.
13.Nxb5 0-0 14.Nd6 Nbc6
14....Rxa2 restores an approximate material equality, at least in the view of those authorities who reckon rook, knight and pawn are worth a queen, but White is much better. One line given by Stockfish10 runs 15.f5 b6 16.Rg1 Ba6 17.f6 Ng6 18.fxg7 Kxg7 19.h4 Bxf1 20.Kxf1 h5 21.f4, and if 21...f5, to stop 22.f5, then 22.Rg5 is very strong.
15.Rg1 Rxa2 16.f5 f6 17.Bc4 Ra4 18.f4 b6 19.fxe6 dxe6 20.Nxc8 Nxc8 21.Bxe6+ Kh8 22.Bxc8?
This gives away much of White's advantage. A strange lapse by Morphy, especially when White had several strong moves, including 22.Qg4 and 22.Bd5.
22...Rxc8!?
More obvious is 22...Rxe4+ 23.Kf2 Rxc8, when the main line given by Stockfish10 and Komodo10, 24.Qd5 Rd4 25.Qe6 Rd2+ 26.Kg3 Rdd9 27.Rd1 Re8 28.Qd7, does not look a clear win for White.
23.Qd7?
White is better, but not necessarily winning, after 23.Qd5 Ne7 24.Qd3.
23...Ne7??
Did Paulsen really play this howler? Yes, according to all the sources I have consulted, and yet it is hard to believe he (and Morphy, for that matter) missed 23...Rxe4+, when Black is fine.
24.Qxe7
24.Qxa4 is also rather good.
24...Ra1+ 25.Kf2 Rxc2+ 26.Ke3 1-0
A strange finish, although the later moves would make a lot more sense if White had played 18.f3 rather than 18.f4. That way, 23.Qd7 would not be a mistake, but the best move in the position. And Black's reply, 23...Ne7, would not be a howler as Black would be lost anyway.
Friday, 20 September 2019
Morphy v The ...e6 Sicilian (part three)
Paul Morphy - Louis Paulsen
First American Chess Congress
Final - Game 5
1.e4 c5 2.Nf3 e6 3.d4 cxd4 4.Nxd4 Bc5 5.Be3
Morphy played 5.Nb3 in his previous two games of the match as White. The text remains a popular choice today, albeit trailing the knight retreat, and is the choice of the analysis engines Stockfish10 and Komodo10.
5...Qb6
GM Vladimir Epishin, an expert in this line as Black, has played the more cautious 5...d6.
6.Nb5!?
Morphy must have anticipated the possibility of 5...Qb6, so it is interesting that in his first game with 5.Be3 he does not give Black the opportunity to capture the possibly-poisoned b2 pawn. I guess he was focused on occupying the hole at d6.
6...Nf6
If 6...Bxe3, White can play 7.Nd6+ Kf8 8.fxe3 Qxe3+ 9.Be2, when, for a pawn, Morphy has the type of position he excelled in - smooth development, an outpost at d6 and attacking chances against a king that has lost castling rights. Black does not have to take the e3 pawn, at least not immediately, eg 8...Nc6 keeps his options open, when White has to chose between continuing to offer a pawn, and temporarily abandoning his knight outpost to protect both e3 and b2 with 9.Nc4.
7.Bxc5 Qxc5 8.Nd6?!
This looks natural, but may not be best. The engines like 8.N1c3!, the point being to delay occupying d6 so the outpost becomes permanent when it is finally occupied, which is not the case after the text.
8...Ke7
Black gives up castling rights to evict the knight, but this is a better version of moving the king than in the note to Black's sixth move.
9.Nxc8+ Rxc8 10.Bd3
Now it is Black who has a lead in development, and the initiative that goes with it. The only fly in the ointment is the position of his king. It looks reasonably safe behind a phalanx of pawns, and is well-placed for an ending, but could become vulnerable to attacks from either flank as well as down the middle.
10...Nc6 11.0-0 h5
A more-promising use of ...h5 than in their last encounter.
12.Nd2 h4 13.h3!?
White's h pawn becomes a target for Black, but Morphy judged this to be a lesser evil than allowing ...h3.
13...g5 14.a3
Seeking counterplay, which is often cited as the No1 requirement for successful defence.
14...Rg8 15.b4 Qb6 16.Nc4 Qb7 17.f3 Ne5 18.Nxe5 Qxe5 19.Qd2 Rg7?!
White's kingside looks suspect, but Paulsen is unable to find a way through, and it is not clear what his last move is aimed at as doubling on the g file looks less than promising. Stockfish10 suggests 19...Qd4+ 20.Qf2 (this seems safer than the engine's alternative of 20.Kh1) Qxf2+ 21.Rxf2 d6, when Stockfish10 reckons Black has the upper hand, but there is certainly no danger of a knockout blow.
20.Rad1 Rd8
Protecting the d pawn so the knight is free to move, but a better way of freeing the knight may have been to play 20...d6. Paulsen was presumably reluctant to move a pawn, especially a pawn protecting his king, from off a light square, where it blunts the actions of the white bishop.
21.Qf2 b6 22.f4
Morphy grabs the chance to activate his queen and king's rook.
22...gxf4 23.Qxf4 Qg5 24.Rf2 Qxf4 25.Rxf4 Rdg8 26.Rd2 Rh8
*****
*****
*****
*****
*****
Black's attack is gone and he is left with a weak pawn at h4. But we are close to an endgame, and his king is better placed than White's for that. White has backward pawns at g2 and c2, but the latter is unlikely to be a problem. He also has an isolated e pawn, but it is not especially weak. The engines reckon the position is dead-equal. The game might come down to who better utilises his minor piece.
27.e5!
A strong move that makes the white bishop look much better. More to the point is that White's rooks might be able to occupy the weak squares in front of Black's backward d and f pawns. Black can solve this problem by playing ...d6 or ...f6, but then White will no longer have an isolani. On the other hand, Black's e pawn will become a protected passer.
27...Nd5 28.Rd4 f6 29.exf6+ Nxf6 30.Rc4 Kd8 31.a4 Nd5 32.Be4 Nc7?!
A difficult decision, but on c7 the knight looks awkwardly out of reach of the kingside. An anonymous ChessBase annotator gives 32...Nf4 33.Bb7 Ng6 as holding the balance.
33.Bf3 d5?!
This weakens e6. The engines suggest 33...Rh6, while preferring White.
34.Rc6 Rd7
ChessBase suggests 34...Rf8, but White has, as in the game, 35.Bg4, and if 35...Rf4 (counterplay presumably being the point of ...Rf8), one line liked by the engines runs 36.b5!? Rxa4 37.Bxe6 Nxe6 38.Rxe6 Rd7 39.Re5 d4 40.Rh5, when White's rooks are more active. However, it is not clear this is enough to win.
35.Bg4 Rh6 36.Re2 Ke7 37.Kh2 Kf7 38.g3 hxg3+ 39.Kxg3
Morphy has solved the problem of his backward g pawn, and now has a passed h pawn to somewhat match Black's passed e pawn. But the main difference in the position is the greater activity of White's pieces.
39...Re7 40.h4 Ne8?!
Bringing the knight to the kingside looks logical, but the engines do not like it, perhaps because now Black's king is tied to defending e6. They suggest counterplay with 40...Rf6!?, a sample line running 41.c3 Rf1 42.h5 Kf6 43.Rh2 Rg1+ 44.Kh4 Kg7 45.Rf2 Kh7 46.Rf6 Re1, when Black may be holding.
41.h5?
Impetuous. Better was 41.Re5 as then 41...Nf6?? fails to 42.Bxe6+.
41...Nf6!
This now works as 42.Bxe6+ Rxe6 43.Rc7+ (not 43.R(either)xe6?? as 43...Nxh5+ 44.Kg4 Rxe6 45.Rxe6 Kxe6 46.Kxh5 Kf5 is a winning pawn-ending for Black) Kf8 44.Rxe6 Nxh5+ 45.Kg4 Rxe6 46.Kxh5 Re7 47.Rxe7 Kxe7 is a drawn pawn-ending.
42.Rcxe6 Rxe6
Black maintains the balance with ChessBase's 42...Rc7!, eg 43.R6e5 Rc3+ 44.Kh4 Rc4 45.Kg5 Rxg4+ 46.Kxh6 Ng8+ 47.Kh7 Nf6+ etc.
43.Bxe6+ Kg7?
Better was 43...Kf8 so Black can win the h pawn without the white rook penetrating via e7. White's edge of having the better minor piece to cooperate with a rook will be minimal as all the remaining pawns are on one side of the board.
44.Bg4 Nxh5+
ChessBase gives this a question mark, but it is the engines' choice, and ChessBase's suggestions of 44...a5 and 44...Ne4+ also lose. Perhaps Black could have tried 44...Kf7!? to cover e7, although White remains a pawn up and with the better minor piece - in other words, White is still winning.
45.Bxh5 Rxh5 46.Re7+ Kf6
The old adage that all rook endings are drawn does not apply here.
47.Rxa7 Ke5 48.Ra6 Rg5+
If 48...Rh6, then simply 49.a5.
49.Kf3 Rf5+ 50.Ke2 b5
Desperation, but again trying to save the pawn by defending it with the black rook is met by a5.
51.axb5 Rf4 52.c3 d4 53.c4
53.cxd4+?? would be an absurd way to chuck a half-point.
53...Rh4 54.c5 Rh2+ 55.Kd3 Rh3+ 56.Kc2
And 56.Kc4?? would be an absurd way to chuck a whole point.
56...Rh2+ 57.Kb3 Rh3+ 58.Ka4 Kd5 59.Rd6+ Kc4 60.c6 Rh1 61.Rxd4+!?
61.Ka5 also wins, but Morphy's solution is simpler.
61...Kxd4 62.c7 Rh8 63.b6 Kc4 64.b7 1-0
The game apparently lasted ten hours.
First American Chess Congress
Final - Game 5
1.e4 c5 2.Nf3 e6 3.d4 cxd4 4.Nxd4 Bc5 5.Be3
Morphy played 5.Nb3 in his previous two games of the match as White. The text remains a popular choice today, albeit trailing the knight retreat, and is the choice of the analysis engines Stockfish10 and Komodo10.
5...Qb6
GM Vladimir Epishin, an expert in this line as Black, has played the more cautious 5...d6.
6.Nb5!?
Morphy must have anticipated the possibility of 5...Qb6, so it is interesting that in his first game with 5.Be3 he does not give Black the opportunity to capture the possibly-poisoned b2 pawn. I guess he was focused on occupying the hole at d6.
6...Nf6
If 6...Bxe3, White can play 7.Nd6+ Kf8 8.fxe3 Qxe3+ 9.Be2, when, for a pawn, Morphy has the type of position he excelled in - smooth development, an outpost at d6 and attacking chances against a king that has lost castling rights. Black does not have to take the e3 pawn, at least not immediately, eg 8...Nc6 keeps his options open, when White has to chose between continuing to offer a pawn, and temporarily abandoning his knight outpost to protect both e3 and b2 with 9.Nc4.
7.Bxc5 Qxc5 8.Nd6?!
This looks natural, but may not be best. The engines like 8.N1c3!, the point being to delay occupying d6 so the outpost becomes permanent when it is finally occupied, which is not the case after the text.
8...Ke7
Black gives up castling rights to evict the knight, but this is a better version of moving the king than in the note to Black's sixth move.
9.Nxc8+ Rxc8 10.Bd3
Now it is Black who has a lead in development, and the initiative that goes with it. The only fly in the ointment is the position of his king. It looks reasonably safe behind a phalanx of pawns, and is well-placed for an ending, but could become vulnerable to attacks from either flank as well as down the middle.
10...Nc6 11.0-0 h5
A more-promising use of ...h5 than in their last encounter.
12.Nd2 h4 13.h3!?
White's h pawn becomes a target for Black, but Morphy judged this to be a lesser evil than allowing ...h3.
13...g5 14.a3
Seeking counterplay, which is often cited as the No1 requirement for successful defence.
14...Rg8 15.b4 Qb6 16.Nc4 Qb7 17.f3 Ne5 18.Nxe5 Qxe5 19.Qd2 Rg7?!
White's kingside looks suspect, but Paulsen is unable to find a way through, and it is not clear what his last move is aimed at as doubling on the g file looks less than promising. Stockfish10 suggests 19...Qd4+ 20.Qf2 (this seems safer than the engine's alternative of 20.Kh1) Qxf2+ 21.Rxf2 d6, when Stockfish10 reckons Black has the upper hand, but there is certainly no danger of a knockout blow.
20.Rad1 Rd8
Protecting the d pawn so the knight is free to move, but a better way of freeing the knight may have been to play 20...d6. Paulsen was presumably reluctant to move a pawn, especially a pawn protecting his king, from off a light square, where it blunts the actions of the white bishop.
21.Qf2 b6 22.f4
Morphy grabs the chance to activate his queen and king's rook.
22...gxf4 23.Qxf4 Qg5 24.Rf2 Qxf4 25.Rxf4 Rdg8 26.Rd2 Rh8
 |
| Who has the advantage? |
*****
*****
*****
*****
Black's attack is gone and he is left with a weak pawn at h4. But we are close to an endgame, and his king is better placed than White's for that. White has backward pawns at g2 and c2, but the latter is unlikely to be a problem. He also has an isolated e pawn, but it is not especially weak. The engines reckon the position is dead-equal. The game might come down to who better utilises his minor piece.
27.e5!
A strong move that makes the white bishop look much better. More to the point is that White's rooks might be able to occupy the weak squares in front of Black's backward d and f pawns. Black can solve this problem by playing ...d6 or ...f6, but then White will no longer have an isolani. On the other hand, Black's e pawn will become a protected passer.
27...Nd5 28.Rd4 f6 29.exf6+ Nxf6 30.Rc4 Kd8 31.a4 Nd5 32.Be4 Nc7?!
A difficult decision, but on c7 the knight looks awkwardly out of reach of the kingside. An anonymous ChessBase annotator gives 32...Nf4 33.Bb7 Ng6 as holding the balance.
33.Bf3 d5?!
This weakens e6. The engines suggest 33...Rh6, while preferring White.
34.Rc6 Rd7
ChessBase suggests 34...Rf8, but White has, as in the game, 35.Bg4, and if 35...Rf4 (counterplay presumably being the point of ...Rf8), one line liked by the engines runs 36.b5!? Rxa4 37.Bxe6 Nxe6 38.Rxe6 Rd7 39.Re5 d4 40.Rh5, when White's rooks are more active. However, it is not clear this is enough to win.
35.Bg4 Rh6 36.Re2 Ke7 37.Kh2 Kf7 38.g3 hxg3+ 39.Kxg3
Morphy has solved the problem of his backward g pawn, and now has a passed h pawn to somewhat match Black's passed e pawn. But the main difference in the position is the greater activity of White's pieces.
39...Re7 40.h4 Ne8?!
Bringing the knight to the kingside looks logical, but the engines do not like it, perhaps because now Black's king is tied to defending e6. They suggest counterplay with 40...Rf6!?, a sample line running 41.c3 Rf1 42.h5 Kf6 43.Rh2 Rg1+ 44.Kh4 Kg7 45.Rf2 Kh7 46.Rf6 Re1, when Black may be holding.
41.h5?
Impetuous. Better was 41.Re5 as then 41...Nf6?? fails to 42.Bxe6+.
41...Nf6!
This now works as 42.Bxe6+ Rxe6 43.Rc7+ (not 43.R(either)xe6?? as 43...Nxh5+ 44.Kg4 Rxe6 45.Rxe6 Kxe6 46.Kxh5 Kf5 is a winning pawn-ending for Black) Kf8 44.Rxe6 Nxh5+ 45.Kg4 Rxe6 46.Kxh5 Re7 47.Rxe7 Kxe7 is a drawn pawn-ending.
42.Rcxe6 Rxe6
Black maintains the balance with ChessBase's 42...Rc7!, eg 43.R6e5 Rc3+ 44.Kh4 Rc4 45.Kg5 Rxg4+ 46.Kxh6 Ng8+ 47.Kh7 Nf6+ etc.
43.Bxe6+ Kg7?
Better was 43...Kf8 so Black can win the h pawn without the white rook penetrating via e7. White's edge of having the better minor piece to cooperate with a rook will be minimal as all the remaining pawns are on one side of the board.
44.Bg4 Nxh5+
ChessBase gives this a question mark, but it is the engines' choice, and ChessBase's suggestions of 44...a5 and 44...Ne4+ also lose. Perhaps Black could have tried 44...Kf7!? to cover e7, although White remains a pawn up and with the better minor piece - in other words, White is still winning.
45.Bxh5 Rxh5 46.Re7+ Kf6
The old adage that all rook endings are drawn does not apply here.
47.Rxa7 Ke5 48.Ra6 Rg5+
If 48...Rh6, then simply 49.a5.
49.Kf3 Rf5+ 50.Ke2 b5
Desperation, but again trying to save the pawn by defending it with the black rook is met by a5.
51.axb5 Rf4 52.c3 d4 53.c4
53.cxd4+?? would be an absurd way to chuck a half-point.
53...Rh4 54.c5 Rh2+ 55.Kd3 Rh3+ 56.Kc2
And 56.Kc4?? would be an absurd way to chuck a whole point.
56...Rh2+ 57.Kb3 Rh3+ 58.Ka4 Kd5 59.Rd6+ Kc4 60.c6 Rh1 61.Rxd4+!?
61.Ka5 also wins, but Morphy's solution is simpler.
61...Kxd4 62.c7 Rh8 63.b6 Kc4 64.b7 1-0
The game apparently lasted ten hours.
Thursday, 19 September 2019
Morphy v The ...e6 Sicilian (part two)
Paul Morphy - Louis Paulsen
First American Chess Congress 1857
Final - Game 4*
1.e4 c5 2.Nf3
Morphy prefers the normal open move-order rather the pseudo-Morra he chose in game one.
2...e6 3.d4 cxd4 4.Nxd4 Bc5 5.Nb3 Bb6 6.Nc3 Nc6
Paulsen previously played the modern favourite 6...Ne7.
7.Bf4
As before, Morphy targets the hole at d6, but this time Paulsen will not let him quickly occupy it with a minor piece.
7...e5!?
This move never caught on, although it is liked by the analysis engines Stockfish10 and Komodo10 (albeit they give White an edge). Today, ...e5 in the Sicilian is quite common. It is usually played in one move, but Black can argue he has not lost a tempo here as 7...e5!? hits White's dark-square bishop and forces it to choose between the c1-h6 and h2-b8 diagonals.
8.Bg3 Nge7 9.Bc4
This bishop takes an inviting diagonal, but note neither white knight is in a position to help pressurise f7.
9...0-0 10.Nb5 a6?!
It is one thing allowing a white knight into d6, but quite another to spend a tempo driving it there. Stockfish10 suggests an interesting pawn sac: 10...d5!? 11.exd5 Na5 12.Nxa5 Bxa5+ 13.c3 a6 14.Na3 b5 15.Bb3 Qd6, although White must be better.
11.Nd6 Bc7 12.a4
Morphy usually liked to castle early, but in this game he takes time out for what he considers more pressing matters, in this case preventing ...b5, which would, to a certain extent, justify 10...a6?!
12...Ng6 13.Qd2 Qf6 14.Rd1 Nf4
As in game one, Paulsen goes for kingside counterplay without much hope of involving many of his queenside pieces.
15.0-0 h5!?
Attacking with the h pawn after castling kingside - quite a modern idea in top-flight chess (and always has been an idea in low-level chess).
16.Nxc8!?
Grabbing a pawn, but it involves giving up a well-placed knight for a poor bishop - not very Morphy-like.
16...Raxc8 17.Qxd7 Nd4?
An anonymous ChessBase annotator suggests 17...g6, without explaining why, but the implication is to take away f5 from the white queen and so avoid an exchange of queens. The text allows minor-piece exchanges that give White's queen more breathing room.
18.Nxd4 exd4 19.Qf5
Even better seems to be 19.Bxf4, eg 19...Qxf4 20.g3, when Black cannot play 20...Qxe4? because of 21.Bxf7+! If 19...Bxf4, then 20.b3, and Black cannot protect both d4 and b7.
19...Qxf5 20.exf5 Be5
The ChessBase annotator suggests giving up a second pawn with 20...d3!?, the idea being that 21.cxd3 (the engines prefer this to 21.Bxd3) Ne2+ 22.Kh1 Nxg3+ 23.fxg3 Be5 gives drawing chances based, presumably, on opposite-coloured bishops and White's disjointed pawn-structure. Paulsen likely decided he had more swindling chances in a pieces-on middlegame.
21.Bxf4 Bxf4 22.Rxd4?!
Morphy may have thought he was winning a second pawn, but Black has tactics that prevent this. Probably better, therefore, was 22.b3 or 22.Bd3.
22...Be5 23.Re4
23.Rh4 is no improvement as the rook cannot leave the fourth rank as long as the white bishop is loose.
23...Bxb2 24.Rb1 Rfd8 25.g3 Rd4 26.Bd3
Or 26.Rxd4 Bxd4 27.Bd3, and Black has time to protect his b pawn.
26...Rxe4 27.Bxe4 Rc4 28.Bxb7 Rxc2 29.Bxa6 Bd4
Perhaps it was this threat to f2 that Morphy missed back on move 22.
30.Rf1
Passivity in rook endings is often fatal to winning chances, and that also applies to rook-and-opposite-coloured-bishop endings. But White seems to have nothing better.
30...Ra2 31.Bb5 Kh7 32.Bc4
The a pawn cannot be advanced, so Morphy jettisons it for a black pawn, but now all pawns will be on one side of the board.
32...Rxa4 33.Bxf7 h4 34.Kg2
If 34.gxh4, then 34...Be5 35.h5 Rh4, winning the h2 pawn.
34...Ra1 35.Bg6+ Kg8 36.Rxa1 Bxa1 ½–½
*****
*****
*****
*****
*****
Komodo10 and Stockfish10 agree White is winning.
That is also a common view on the internet. eg at chessgames.com, where various reasons are given for Morphy agreeing a draw:
He disliked endgames, I think - Catfriend
I believe white has a win here. Not an easy win, but a win nonetheless. Maybe they agreed to a draw because of exhaustion. Some of the games played in that era could go on for days - technicaldraw
Morphy often agreed to draws in positions that favoured him. These days we're concerned with squeezing something from everything and never giving half points away, and that's fair enough; in Morphy's time he was a living legend [this was Morphy's first serious tournament, and possibly his first tournament of any kind], hailed across the world, and romance was the order of the day. The occasional draw was neither here nor there - TrueFiendish
Ask yourself: who's asking for the 'draw', Morphy or Paulsen? And remember the 'Age' in which the're playing. Chess etiquette was an essential character trait of this young master, as was his generosity. Gestures such as this reveal a depth of compassion, adding stature to the growing legend - Rory O Rion
I think Morphy agreed to the draw because playing Paulsen was like watching paint dry - RookFile
Amateur psychology aside, let's take a look at the position on the board.
The first thing to note, apart from the opposite-coloured-bishops, is that White has the wrong bishop for promoting an h pawn as h8 is a dark square.
Bearing that in mind, here is the mainline, compiled largely by the engines with me playing Black:
37.Kh3 hxg3 38.fxg3 Bf6
It does not matter where exactly the bishop goes as long as it oscillates on the long dark diagonal.
39.Kg4 Bb2 40.h4 Bf6 41.Kf4 Bb2 42.g4 Bf6 43.g5 Bb2
How can White make progress? The engines still believe White is winning, but their evaluation stays exactly the same and all they do from now on is move the white king here and there - both signs that a position is really drawn.
Indeed it can be seen that even if White could somehow get in the move f6 (or the moves h5-h6) without losing material, Black can play ...gxf6 (or ...gxh6), leaving White with pawns on the h and f files. Both those files' queening squares, from White's perspective, are dark squares, which can easily be controlled by Black's king and bishop.
Going back to the diagram, White could go three pawns up by playing 37.gxh4, but then he has two sets of doubled pawns on files with dark queening squares.
So the answer is: No, Morphy should not have played on.
*Morphy had the white pieces in games one, four, five and seven; Paulsen in two, three, six and eight.
First American Chess Congress 1857
Final - Game 4*
1.e4 c5 2.Nf3
Morphy prefers the normal open move-order rather the pseudo-Morra he chose in game one.
2...e6 3.d4 cxd4 4.Nxd4 Bc5 5.Nb3 Bb6 6.Nc3 Nc6
Paulsen previously played the modern favourite 6...Ne7.
7.Bf4
As before, Morphy targets the hole at d6, but this time Paulsen will not let him quickly occupy it with a minor piece.
7...e5!?
This move never caught on, although it is liked by the analysis engines Stockfish10 and Komodo10 (albeit they give White an edge). Today, ...e5 in the Sicilian is quite common. It is usually played in one move, but Black can argue he has not lost a tempo here as 7...e5!? hits White's dark-square bishop and forces it to choose between the c1-h6 and h2-b8 diagonals.
8.Bg3 Nge7 9.Bc4
This bishop takes an inviting diagonal, but note neither white knight is in a position to help pressurise f7.
9...0-0 10.Nb5 a6?!
It is one thing allowing a white knight into d6, but quite another to spend a tempo driving it there. Stockfish10 suggests an interesting pawn sac: 10...d5!? 11.exd5 Na5 12.Nxa5 Bxa5+ 13.c3 a6 14.Na3 b5 15.Bb3 Qd6, although White must be better.
11.Nd6 Bc7 12.a4
Morphy usually liked to castle early, but in this game he takes time out for what he considers more pressing matters, in this case preventing ...b5, which would, to a certain extent, justify 10...a6?!
12...Ng6 13.Qd2 Qf6 14.Rd1 Nf4
As in game one, Paulsen goes for kingside counterplay without much hope of involving many of his queenside pieces.
15.0-0 h5!?
Attacking with the h pawn after castling kingside - quite a modern idea in top-flight chess (and always has been an idea in low-level chess).
16.Nxc8!?
Grabbing a pawn, but it involves giving up a well-placed knight for a poor bishop - not very Morphy-like.
16...Raxc8 17.Qxd7 Nd4?
An anonymous ChessBase annotator suggests 17...g6, without explaining why, but the implication is to take away f5 from the white queen and so avoid an exchange of queens. The text allows minor-piece exchanges that give White's queen more breathing room.
18.Nxd4 exd4 19.Qf5
Even better seems to be 19.Bxf4, eg 19...Qxf4 20.g3, when Black cannot play 20...Qxe4? because of 21.Bxf7+! If 19...Bxf4, then 20.b3, and Black cannot protect both d4 and b7.
19...Qxf5 20.exf5 Be5
The ChessBase annotator suggests giving up a second pawn with 20...d3!?, the idea being that 21.cxd3 (the engines prefer this to 21.Bxd3) Ne2+ 22.Kh1 Nxg3+ 23.fxg3 Be5 gives drawing chances based, presumably, on opposite-coloured bishops and White's disjointed pawn-structure. Paulsen likely decided he had more swindling chances in a pieces-on middlegame.
21.Bxf4 Bxf4 22.Rxd4?!
Morphy may have thought he was winning a second pawn, but Black has tactics that prevent this. Probably better, therefore, was 22.b3 or 22.Bd3.
22...Be5 23.Re4
23.Rh4 is no improvement as the rook cannot leave the fourth rank as long as the white bishop is loose.
23...Bxb2 24.Rb1 Rfd8 25.g3 Rd4 26.Bd3
Or 26.Rxd4 Bxd4 27.Bd3, and Black has time to protect his b pawn.
26...Rxe4 27.Bxe4 Rc4 28.Bxb7 Rxc2 29.Bxa6 Bd4
Perhaps it was this threat to f2 that Morphy missed back on move 22.
30.Rf1
Passivity in rook endings is often fatal to winning chances, and that also applies to rook-and-opposite-coloured-bishop endings. But White seems to have nothing better.
30...Ra2 31.Bb5 Kh7 32.Bc4
The a pawn cannot be advanced, so Morphy jettisons it for a black pawn, but now all pawns will be on one side of the board.
32...Rxa4 33.Bxf7 h4 34.Kg2
If 34.gxh4, then 34...Be5 35.h5 Rh4, winning the h2 pawn.
34...Ra1 35.Bg6+ Kg8 36.Rxa1 Bxa1 ½–½
 |
| The final position - should Morphy have played on? |
*****
*****
*****
*****
Komodo10 and Stockfish10 agree White is winning.
That is also a common view on the internet. eg at chessgames.com, where various reasons are given for Morphy agreeing a draw:
He disliked endgames, I think - Catfriend
I believe white has a win here. Not an easy win, but a win nonetheless. Maybe they agreed to a draw because of exhaustion. Some of the games played in that era could go on for days - technicaldraw
Morphy often agreed to draws in positions that favoured him. These days we're concerned with squeezing something from everything and never giving half points away, and that's fair enough; in Morphy's time he was a living legend [this was Morphy's first serious tournament, and possibly his first tournament of any kind], hailed across the world, and romance was the order of the day. The occasional draw was neither here nor there - TrueFiendish
Ask yourself: who's asking for the 'draw', Morphy or Paulsen? And remember the 'Age' in which the're playing. Chess etiquette was an essential character trait of this young master, as was his generosity. Gestures such as this reveal a depth of compassion, adding stature to the growing legend - Rory O Rion
I think Morphy agreed to the draw because playing Paulsen was like watching paint dry - RookFile
Amateur psychology aside, let's take a look at the position on the board.
The first thing to note, apart from the opposite-coloured-bishops, is that White has the wrong bishop for promoting an h pawn as h8 is a dark square.
Bearing that in mind, here is the mainline, compiled largely by the engines with me playing Black:
37.Kh3 hxg3 38.fxg3 Bf6
It does not matter where exactly the bishop goes as long as it oscillates on the long dark diagonal.
39.Kg4 Bb2 40.h4 Bf6 41.Kf4 Bb2 42.g4 Bf6 43.g5 Bb2
How can White make progress? The engines still believe White is winning, but their evaluation stays exactly the same and all they do from now on is move the white king here and there - both signs that a position is really drawn.
Indeed it can be seen that even if White could somehow get in the move f6 (or the moves h5-h6) without losing material, Black can play ...gxf6 (or ...gxh6), leaving White with pawns on the h and f files. Both those files' queening squares, from White's perspective, are dark squares, which can easily be controlled by Black's king and bishop.
Going back to the diagram, White could go three pawns up by playing 37.gxh4, but then he has two sets of doubled pawns on files with dark queening squares.
So the answer is: No, Morphy should not have played on.
*Morphy had the white pieces in games one, four, five and seven; Paulsen in two, three, six and eight.
Tuesday, 17 September 2019
Morphy v The ...e6 Sicilian
THE vast majority of Paul Morphy's opponents met his invariable 1.e4 with 1...e5.
But the Sicilian Defence was popular for much of the 19th century, and Morphy met one of its champions, the German master Louis Paulsen, in the first American Chess Congress.
This was held in New York in 1857 as a knockout tournament, and had the happy coincidence that the two best players met in the eight-game final.
In all four games in which Morphy had the white pieces, Paulsen replied with what is sometimes still called the Paulsen Variation of the Sicilian, and it is these four games I will be looking at in this series.
Morphy - Paulsen
Game 1
1.e4 c5 2.d4
Morphy varied between 2.d4 cxd4 3.Nf3 and the modern move-order of 2.Nf3 and 3.d4. He never played the Morra.
2...cxd4 3.Nf3 e6
3...e5!? is usually treated scornfully in opening publications, but it was successfully used by Howard Staunton in 1842 against John Cochrane, and is regarded by the analysis engines Stockfish10 and Komodo10 as giving an equal game.
4.Nxd4 Bc5!?
This has largely been superseded by 4...a6, 4...Nc6, 4...Nf6 and 4...Qb6, but is a favourite of the Russian GM, and former Karpov second, Vladimir Epishin.
5.Nb3
Morphy is credited by an anonymous annotator in ChessBase's 2019 Mega database as the inventor of this move, at least when used with Bf4 to highlight Black's weakness at d6. While this is not true - the plan was used by Tassilo von Heydebrand und der Lasa in a game seven years earlier - it may be fair to say Morphy's use of it in his match against Paulsen was a major factor in popularising the idea.
5...Bb6 6.Nc3 Ne7
Overwhelmingly the most-popular move today, but Heydebrand's opponent, August Ehrmann, preferred the modern-looking 6...a6.
7.Bf4 0-0
7...d5!? has been successfully used by the Filipino IM Paulo Bersamina.
8.Bd6 f5
Black's position looks rather restricted, but Paulsen was apparently relying on this pawn-break to create kingside counterplay.
*****
*****
*****
*****
*****
9.e5
Keeping the f file closed might seem a no-brainer, but Russian-born GM Sergei Tiviakov preferred 9.Qd2!? in a 1999 win over a 2294. I guess his thinking was that ...fxe4 is double-edged as White replies Nxe4 with hopes of his own quick kingside attack.
9...a6
Jim Plaskett - then an IM, now a GM - preferred 9...f4 in a 1983 draw against GM Sergey Kudrin.
10.Be2 Nbc6 11.0-0 Rf7
The game has transposed into the 1850 game Heydebrand - Ehrmann, which continued 12.a4 Ng6 13.Bh5, when the engines reckon Black could have freed his game with 13...Ncxe5!? 14.Bxe5 Nxe5 15.Bxf7+ Nxf7.
Morphy prefers to go for a kingside attack before Black can mobilise his queenside.
12.Kh1 f4!?
As the ChessBase annotator notes, this prevents 13.f4 and frees f5 for the black king's knight, but also frees e4 for White's pieces.
13.Ne4 Nf5?!
The engines prefer a ChessBase suggestion of targeting the e5 pawn by 13...Ng6, although they believe White has more than enough compensation for the fall of the pawn.
14.Bh5 g6?!
This weakens f6, which is why ChessBase and the engines prefer 15...Nxd6 followed by ...Rf8.
15.Bg4
Even stronger is 15.Bf3!, the point being that 15...Nxd6 can be met by 16.Nxd6 Rf8 (ChessBase suggests sacing the exchange with 16...Nxe5!?) 17.Bxc6, when White has a monster knight entrenched on d6.
*****
*****
*****
*****
*****
15...Ng7?
As the ChessBase annotator laconically puts it: "Not easy to understand." Better was 15...Nxd6 16.Nxd6 Rf8, when the knight on c6 gives Black distracting pressure against e5.
16.Qf3 h5 17.Bh3 Qh4
Paulsen seems to have overestimated his attacking chances. However, the engines' suggested 17...Ne8, protecting f6, does not inspire confidence - Black's queenside pieces are largely locked out of the game.
18.Nf6+ Kh8 19.Qe4 Qg5 20.g3 f3
This pawn will be lost, but it is understandable that Paulsen did not want to play 20...fxg3 and open the f file for the white rooks.
21.Nd2! Bd8
Not 21...Qxd2?? 22.Qxg6.
22.Nxf3 Qh6 23.Rg1 Bxf6 24.exf6 Ne8
Not much better is 24...Rxf6. The engines give 25.Bf4 Qh7 followed by, for example, 26.Qe2 Nf5 27.Rad1 d5 28.Rge1 Bd7 29.Ne5, when it is hard to see Black holding out for long.
25.Bf4 Nxf6
Moving the queen is equally hopeless.
26.Qxc6 Qxf4 27.Qxc8+ (1-0, 40 moves)
But the Sicilian Defence was popular for much of the 19th century, and Morphy met one of its champions, the German master Louis Paulsen, in the first American Chess Congress.
This was held in New York in 1857 as a knockout tournament, and had the happy coincidence that the two best players met in the eight-game final.
In all four games in which Morphy had the white pieces, Paulsen replied with what is sometimes still called the Paulsen Variation of the Sicilian, and it is these four games I will be looking at in this series.
Morphy - Paulsen
Game 1
1.e4 c5 2.d4
Morphy varied between 2.d4 cxd4 3.Nf3 and the modern move-order of 2.Nf3 and 3.d4. He never played the Morra.
2...cxd4 3.Nf3 e6
3...e5!? is usually treated scornfully in opening publications, but it was successfully used by Howard Staunton in 1842 against John Cochrane, and is regarded by the analysis engines Stockfish10 and Komodo10 as giving an equal game.
4.Nxd4 Bc5!?
This has largely been superseded by 4...a6, 4...Nc6, 4...Nf6 and 4...Qb6, but is a favourite of the Russian GM, and former Karpov second, Vladimir Epishin.
5.Nb3
Morphy is credited by an anonymous annotator in ChessBase's 2019 Mega database as the inventor of this move, at least when used with Bf4 to highlight Black's weakness at d6. While this is not true - the plan was used by Tassilo von Heydebrand und der Lasa in a game seven years earlier - it may be fair to say Morphy's use of it in his match against Paulsen was a major factor in popularising the idea.
5...Bb6 6.Nc3 Ne7
Overwhelmingly the most-popular move today, but Heydebrand's opponent, August Ehrmann, preferred the modern-looking 6...a6.
7.Bf4 0-0
7...d5!? has been successfully used by the Filipino IM Paulo Bersamina.
8.Bd6 f5
Black's position looks rather restricted, but Paulsen was apparently relying on this pawn-break to create kingside counterplay.
 |
| How should White proceed? |
*****
*****
*****
*****
9.e5
Keeping the f file closed might seem a no-brainer, but Russian-born GM Sergei Tiviakov preferred 9.Qd2!? in a 1999 win over a 2294. I guess his thinking was that ...fxe4 is double-edged as White replies Nxe4 with hopes of his own quick kingside attack.
9...a6
Jim Plaskett - then an IM, now a GM - preferred 9...f4 in a 1983 draw against GM Sergey Kudrin.
10.Be2 Nbc6 11.0-0 Rf7
The game has transposed into the 1850 game Heydebrand - Ehrmann, which continued 12.a4 Ng6 13.Bh5, when the engines reckon Black could have freed his game with 13...Ncxe5!? 14.Bxe5 Nxe5 15.Bxf7+ Nxf7.
Morphy prefers to go for a kingside attack before Black can mobilise his queenside.
12.Kh1 f4!?
As the ChessBase annotator notes, this prevents 13.f4 and frees f5 for the black king's knight, but also frees e4 for White's pieces.
13.Ne4 Nf5?!
The engines prefer a ChessBase suggestion of targeting the e5 pawn by 13...Ng6, although they believe White has more than enough compensation for the fall of the pawn.
14.Bh5 g6?!
This weakens f6, which is why ChessBase and the engines prefer 15...Nxd6 followed by ...Rf8.
15.Bg4
Even stronger is 15.Bf3!, the point being that 15...Nxd6 can be met by 16.Nxd6 Rf8 (ChessBase suggests sacing the exchange with 16...Nxe5!?) 17.Bxc6, when White has a monster knight entrenched on d6.
 |
| Black is under pressure, but can you come up with a better move than Paulsen managed? |
*****
*****
*****
*****
15...Ng7?
As the ChessBase annotator laconically puts it: "Not easy to understand." Better was 15...Nxd6 16.Nxd6 Rf8, when the knight on c6 gives Black distracting pressure against e5.
16.Qf3 h5 17.Bh3 Qh4
Paulsen seems to have overestimated his attacking chances. However, the engines' suggested 17...Ne8, protecting f6, does not inspire confidence - Black's queenside pieces are largely locked out of the game.
18.Nf6+ Kh8 19.Qe4 Qg5 20.g3 f3
This pawn will be lost, but it is understandable that Paulsen did not want to play 20...fxg3 and open the f file for the white rooks.
21.Nd2! Bd8
Not 21...Qxd2?? 22.Qxg6.
22.Nxf3 Qh6 23.Rg1 Bxf6 24.exf6 Ne8
Not much better is 24...Rxf6. The engines give 25.Bf4 Qh7 followed by, for example, 26.Qe2 Nf5 27.Rad1 d5 28.Rge1 Bd7 29.Ne5, when it is hard to see Black holding out for long.
25.Bf4 Nxf6
Moving the queen is equally hopeless.
26.Qxc6 Qxf4 27.Qxc8+ (1-0, 40 moves)
Friday, 26 July 2019
New York Giants
CONTINUING to go through Tartakower and du Mont's 500 Master Games Of Chess, I have reached a game played in the final of the first American Chess Congress, held in New York in 1857.
This event was organised as a series of knockout matches that happily ended with a final between the two strongest players, Paul Morphy and Louis Paulsen.
Both had been unbeaten in reaching the final, with each conceding just a single draw against their semi-final opponents.
According to Bill Wall's chess trivia, it cost $10 to play in the tournament, with an admission fee for spectators of $5.
These are much larger sums than they may seem at first sight. According to the Measuring Worth website, $10 in 1857 is worth almost $300 today if comparing consumer prices, and an eye-watering $4,000+ if comparing average incomes.
Notes in italics are algebraicised from 500 Master Games Of Chess.
Paulsen - Morphy
Spanish Four Knights
Although this game is adorned by one of the most famous queen sacrifices in the literature of the game, it also illustrates quite a number of additional tactical and strategic points; a temporary sacrifice, operations on open files, exploitation of a hole (d3), breaking up of the king's defences, irruption on the seventh rank, etc. Historically, this game spread Morphy's fame to Europe and presaged his coming triumphs in the old world.
1.e4 e5 2.Nf3 Nc6 3.Nc3
A forerunner of the modern style, Louis Paulsen prefers a quiet and solid opening, whereas the general tendency of his time was to play the gambits - King's, Scotch, Evans, etc.
3...Nf6 4.Bb5
The Spanish Four Knights, the most scientific of all. Playable also is 4.Bc4, the Italian, and 4.d4, the Scotch Four Knights. Less pugnacious is the restricted development 4.Be2, and Gunsberg's 4.a3, which is best answered by 4...Bc5, claiming the initiative.
4...Bc5
A more stimulating reply than the symmetrical 4...Bb4.
"Rubinstein's" 4...Nd4!? was apparently first played by Emil Schallopp in 1881 in a loss to … Paulsen.
5.0-0
This continuation, storing up energy, is better than hitting out at once with 5.Nxe5 (5...Nxe5 6.d4) or than 5.d3, renouncing any offensive in the centre.
5...0-0
After the more timid 5...d6, the initiative for a long time to come remains with White after 6.d4 exd4 7.Nxd4 Bd7 8.Nf5 0-0 9.Bg5 etc.
Paulsen beat Zukertort with this line in 1877.
6.Nxe5
This temporary sacrifice (6...Nxe5 7.d4) is not without risks for White, as his great adversary immediately tries to demonstrate. After 6.Bxc6 dxc6 7.Nxe5 Re8 8.Nd3 Bd4 etc, the game has lost some of its plasticity, and after 6.d3 d6 7.Bg5 Ne7 etc, leads to a slowing down of operations.
6...Re8
Aiming at the full development of his forces. After 6...Bd4 7.Nf3 Bxc3 8.dxc3 Nxe4 9.Re1 d5 10.c4 Nf6 11.Bg5, White has command of the central files. If 6...Nd4, 7.Bc4.
7.Nxc6
A careful defence is 7.Nf3 Nxe4 8.d4 Nxc3 9.bxc3 Bf8, and the position tends to equality.
7...dxc6 8.Bc4
An immediate and full retreat shows more prudence by 8.Be2 Nxe4 9.Nxe4 Rxe4 10.d3 Re8 11.c3 with 12.d4 to follow.
8.Be2 is not in ChessBase's 2019 Mega database, but is the choice of both Stockfish10 and Komodo9.
8...b5
Not yet 8...Nxe4 on account of 9.Nxe4 Rxe4 10.Bxf7+, for if 10...Kxf7, 11.Qf3+ followed by queen takes rook.
An interesting idea here is 8...Ng4 with 9.h3 Nxf2 10.Bxf7+ Kh8, and Black has the last word.
9.Be2 Nxe4 10.Nxe4 Rxe4 11.Bf3
He is hypnotised by Black's weakness at c6. More self-control is shown by 11.d3 Re6 12.c3, to be followed by 13.d4.
11...Re6 12.c3
An error of judgment. He underrates the dangers of the hole at d3. After 12.d3, White's game could be defended.
12...Qd3 13.b4?!
The engines reckon White is fine if he takes immediate steps to evict Black's queen, eg 13. Re1 Rxe1+ 13.Qxe1 Bd7 14.Qf1.
13...Bb6 14.a4?!
A clever plan. Beaten in the first skirmish, White wants to make up leeway in the second, and to release, by turning manoeuvres, the pressure established by Black's queen.
Despite Tartakower's words, Re1 again seems to be better.
14...bax4
Necessary because of the threat 15.a5. If 14...a6, 15.axb5 Qxb5 (evidently not 15...axb5, nor 15...cxb5), 16.d4, breaking the charm.
15.Qxa4 Bd7?
A mistake that allows White a chance, which he misses, to break the bind. Correct was 15...Bb7, covering both c6 and a6.
16.Ra2?
Intending 16.Qc2, but the immediate opposition of the queen by Qa6 is essential.
16...Rae8
A crushing concentration (threat: 17...Qxf1+).
17.Qa6
Too late.
*****
*****
*****
*****
*****
17...Qxf3!!
A splendid sacrifice of the queen, which breaks the hostile king's defence.
18.gxf3 Rg6+ 19.Kh1 Bh3 20.Rd1?
Clearly neither 20.d4 Bg2+ 21.Kg1 Bxf3# [this should read 21...Bxf3+ 22.Bg5 Rxg5#], nor 20.Rg1 Bg7+ 21.Rxg2 Re1+, followed by mate in two. Relatively better would have been 20.Qd3.
Morphy apparently spent 30 minutes over his 17th move, and it may well be a large portion of that time was spent on how to meet 20.Qd3.
*****
*****
*****
*****
*****
If 20.Qd3, the engines give 20...f5!, the idea being to stop the queen from sacrificing itself for the rook on g6, as 20...Bg2+? 21.Kg1 Bxf3+ fails to 22.Qxg6. After 22...hxg6, Black would have the bishop-pair and a pawn for the exchange, but 23.d3 would prevent Black's rook transferring to the g file, and White's superior pawn-structure would give him the advantage.
After 20.Rd1?, the game continued:
20...Bg2+ 21.Kg1 Bxf3+ 22.Kf1 Bg2+
Morphy has his whole plan cut and dried in his mind. Another method is 22...Rg2, with a view to ...Rxh2 and ...Rh1#.
23.Kg1 Bh3+
This wins very easily, but the engines point out a quicker finish, ie 23...Be4+ 24.Kf1 Bf5 etc.
24.Kh1 Bxf2 25.Qf1
The only chance of prolonging the game for a little while.
25...Bxf1 26.Rxf1 Re2 27.Ra1 Rh6 28.d4 Be3+ 0-1
This event was organised as a series of knockout matches that happily ended with a final between the two strongest players, Paul Morphy and Louis Paulsen.
Both had been unbeaten in reaching the final, with each conceding just a single draw against their semi-final opponents.
According to Bill Wall's chess trivia, it cost $10 to play in the tournament, with an admission fee for spectators of $5.
These are much larger sums than they may seem at first sight. According to the Measuring Worth website, $10 in 1857 is worth almost $300 today if comparing consumer prices, and an eye-watering $4,000+ if comparing average incomes.
Notes in italics are algebraicised from 500 Master Games Of Chess.
Paulsen - Morphy
Spanish Four Knights
Although this game is adorned by one of the most famous queen sacrifices in the literature of the game, it also illustrates quite a number of additional tactical and strategic points; a temporary sacrifice, operations on open files, exploitation of a hole (d3), breaking up of the king's defences, irruption on the seventh rank, etc. Historically, this game spread Morphy's fame to Europe and presaged his coming triumphs in the old world.
1.e4 e5 2.Nf3 Nc6 3.Nc3
A forerunner of the modern style, Louis Paulsen prefers a quiet and solid opening, whereas the general tendency of his time was to play the gambits - King's, Scotch, Evans, etc.
3...Nf6 4.Bb5
The Spanish Four Knights, the most scientific of all. Playable also is 4.Bc4, the Italian, and 4.d4, the Scotch Four Knights. Less pugnacious is the restricted development 4.Be2, and Gunsberg's 4.a3, which is best answered by 4...Bc5, claiming the initiative.
4...Bc5
A more stimulating reply than the symmetrical 4...Bb4.
"Rubinstein's" 4...Nd4!? was apparently first played by Emil Schallopp in 1881 in a loss to … Paulsen.
5.0-0
This continuation, storing up energy, is better than hitting out at once with 5.Nxe5 (5...Nxe5 6.d4) or than 5.d3, renouncing any offensive in the centre.
5...0-0
After the more timid 5...d6, the initiative for a long time to come remains with White after 6.d4 exd4 7.Nxd4 Bd7 8.Nf5 0-0 9.Bg5 etc.
Paulsen beat Zukertort with this line in 1877.
6.Nxe5
This temporary sacrifice (6...Nxe5 7.d4) is not without risks for White, as his great adversary immediately tries to demonstrate. After 6.Bxc6 dxc6 7.Nxe5 Re8 8.Nd3 Bd4 etc, the game has lost some of its plasticity, and after 6.d3 d6 7.Bg5 Ne7 etc, leads to a slowing down of operations.
6...Re8
Aiming at the full development of his forces. After 6...Bd4 7.Nf3 Bxc3 8.dxc3 Nxe4 9.Re1 d5 10.c4 Nf6 11.Bg5, White has command of the central files. If 6...Nd4, 7.Bc4.
7.Nxc6
A careful defence is 7.Nf3 Nxe4 8.d4 Nxc3 9.bxc3 Bf8, and the position tends to equality.
7...dxc6 8.Bc4
An immediate and full retreat shows more prudence by 8.Be2 Nxe4 9.Nxe4 Rxe4 10.d3 Re8 11.c3 with 12.d4 to follow.
8.Be2 is not in ChessBase's 2019 Mega database, but is the choice of both Stockfish10 and Komodo9.
8...b5
Not yet 8...Nxe4 on account of 9.Nxe4 Rxe4 10.Bxf7+, for if 10...Kxf7, 11.Qf3+ followed by queen takes rook.
An interesting idea here is 8...Ng4 with 9.h3 Nxf2 10.Bxf7+ Kh8, and Black has the last word.
9.Be2 Nxe4 10.Nxe4 Rxe4 11.Bf3
He is hypnotised by Black's weakness at c6. More self-control is shown by 11.d3 Re6 12.c3, to be followed by 13.d4.
11...Re6 12.c3
An error of judgment. He underrates the dangers of the hole at d3. After 12.d3, White's game could be defended.
12...Qd3 13.b4?!
The engines reckon White is fine if he takes immediate steps to evict Black's queen, eg 13. Re1 Rxe1+ 13.Qxe1 Bd7 14.Qf1.
13...Bb6 14.a4?!
A clever plan. Beaten in the first skirmish, White wants to make up leeway in the second, and to release, by turning manoeuvres, the pressure established by Black's queen.
Despite Tartakower's words, Re1 again seems to be better.
14...bax4
Necessary because of the threat 15.a5. If 14...a6, 15.axb5 Qxb5 (evidently not 15...axb5, nor 15...cxb5), 16.d4, breaking the charm.
15.Qxa4 Bd7?
A mistake that allows White a chance, which he misses, to break the bind. Correct was 15...Bb7, covering both c6 and a6.
16.Ra2?
Intending 16.Qc2, but the immediate opposition of the queen by Qa6 is essential.
16...Rae8
A crushing concentration (threat: 17...Qxf1+).
17.Qa6
Too late.
 |
| White's queen prevents Black sacing on f1, but ... |
*****
*****
*****
*****
17...Qxf3!!
A splendid sacrifice of the queen, which breaks the hostile king's defence.
18.gxf3 Rg6+ 19.Kh1 Bh3 20.Rd1?
Clearly neither 20.d4 Bg2+ 21.Kg1 Bxf3# [this should read 21...Bxf3+ 22.Bg5 Rxg5#], nor 20.Rg1 Bg7+ 21.Rxg2 Re1+, followed by mate in two. Relatively better would have been 20.Qd3.
Morphy apparently spent 30 minutes over his 17th move, and it may well be a large portion of that time was spent on how to meet 20.Qd3.
 |
| Black to play and win after the variation 20.Qd3 |
*****
*****
*****
*****
If 20.Qd3, the engines give 20...f5!, the idea being to stop the queen from sacrificing itself for the rook on g6, as 20...Bg2+? 21.Kg1 Bxf3+ fails to 22.Qxg6. After 22...hxg6, Black would have the bishop-pair and a pawn for the exchange, but 23.d3 would prevent Black's rook transferring to the g file, and White's superior pawn-structure would give him the advantage.
After 20.Rd1?, the game continued:
20...Bg2+ 21.Kg1 Bxf3+ 22.Kf1 Bg2+
Morphy has his whole plan cut and dried in his mind. Another method is 22...Rg2, with a view to ...Rxh2 and ...Rh1#.
23.Kg1 Bh3+
This wins very easily, but the engines point out a quicker finish, ie 23...Be4+ 24.Kf1 Bf5 etc.
24.Kh1 Bxf2 25.Qf1
The only chance of prolonging the game for a little while.
25...Bxf1 26.Rxf1 Re2 27.Ra1 Rh6 28.d4 Be3+ 0-1
Subscribe to:
Posts (Atom)